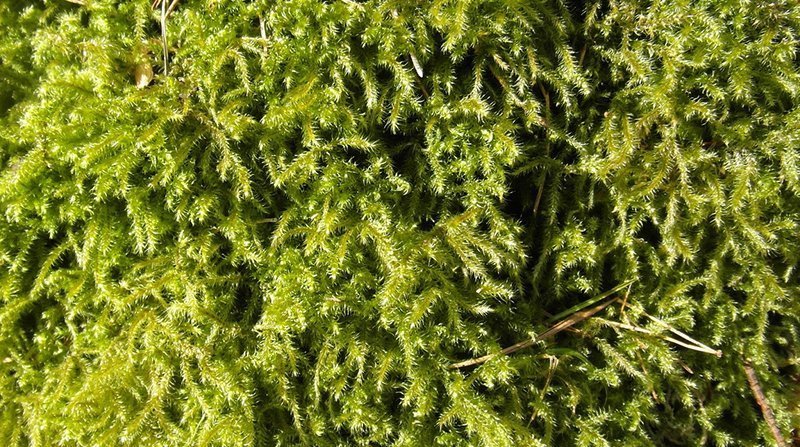
Lawn moss is very common. In fact, moss will creep into most lawns at some point.
Infestations can be small and some can be big. Sometimes to the point where there is very little grass left. Some can be so bad that your lawn also suffers from the presence of lichens and liverworts.
But don’t worry, lawn moss removal and preventing it from coming back is a pretty simple process.
The 3 Main Causes of Moss in Lawns
As common as lawn moss is, it’s one of the most misunderstood lawn problems.
Most lawn owners treat moss as the problem itself and then wonder why it grows back whenever the rains come.
It’s important to understand that lawn moss is the result of other problems – not the problem itself.
If you want to remove moss from your lawn and stop it from coming back, you need to figure out why it’s growing in the first place. Then you can fix those problems and make changes to prevent it from coming back.
So what causes moss in lawns?
Here are three main factors;
Poor Lawn Care Practices
Poor lawn care practice is all about you, or the owner/keeper of the lawn. If you or your gardener do any of the following, you’re contributing to the problem;
- Not cutting the grass regularly
- Scalping the lawn or cutting the grass too short
- Not aerating heavily used or compacted areas of the lawn
- Poor use (or no use) of lawn fertilisers
- Not scarifying to remove excess thatch
- Letting fallen leaves sit and rot on the grass through autumn and winter
Environmental Factors
Environmental factors are things that you may or may not have control over. They include;
- A lot of shade over your lawn
- Heavy clay or sandy soil
- Poor air circulation around your garden
- Dry areas
- North Facing Lawns
The Climate
Unfortunately, there’s nothing you can do about the climate and the British weather can change dramatically from one year to the next. The following climates will all contribute to poor grass growth and/or moss infestations;
Poor Grass Growth
- Cold, dry springs
- Long, hot summers
- Dry summers
Good Moss Growth
- Excessive rainfall in summer and other seasons
- Cloudy, cool summers
As you can see, moss isn’t fussy about the conditions it grows in. But when it comes to beating moss, good lawn care practices will have by far the biggest impact.
To illustrate…
…A lawn that is cut to the bone every 8 weeks with a rusty old lawnmower might be riddled with moss, even if the conditions for growing grass are perfect.
On the other hand, a well-maintained lawn can look beautiful, even though the soil might not be perfect and the garden covered in shade.
The Best Time of Year to Kill and Remove Lawn Moss
If you have moss in your lawn you’ll need to implement a lawn moss removal procedure. Remember though, moss can grow as a result of the lawn being in poor shape. In which case, moss removal is just one step in a full lawn renovation program.
The amount of moss in the lawn will dictate both the time of year you tackle the problem and also how you go about it.
Either way, you want your lawn to recover as quickly as possible. To do this it needs good growing conditions. That’s a mixture of warmth, rain and sun.
Spring: For Small Amounts of Lawn Moss
If there is only a small amount of moss in your lawn and you still have lots of grass, tackle it in spring with an application of lawn sand followed by raking.
The treatment shouldn’t be too invasive and spring provides good conditions for grass growth, so your lawn should recover pretty well with a good recovery program (we’ll talk about this later on).
Autumn: For Large Moss Infestations
If the moss has really got a hold of your lawn and there’s a lot of it, it’s best to wait until the Autumn and spray it with a liquid moss killer.
The reason being is that once the moss has been killed and removed there will be a lot of open soil. This provides the perfect bed to sow new grass seed.
If you open the ground up to this extent in the spring, this perfect seedbed is also open to all the weed seeds that germinate in spring. Dandelions spread thousands of seeds for example. The result is that you could end up replacing your moss problem with a weed problem.
By waiting until the Autumn, you avoid the majority of the years weed seeds and your grass is free to recover.
Tools and Equipment For Lawn Moss Removal
Before you can begin your crusade against moss you need the right equipment. Here’s what you’ll need;
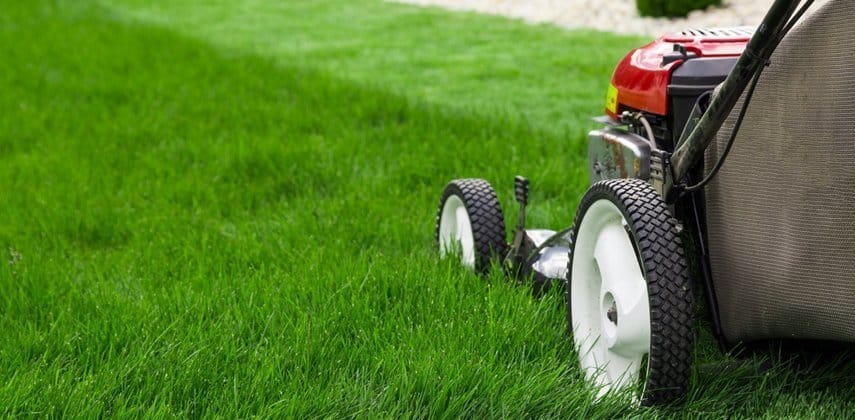
Lawnmower

Cutting the grass quite short will make the whole process that bit easier.
If your lawnmower has a grass collection box, you can use it to ‘hoover up’ the moss that comes out of your lawn.
This saves you having to rake the majority of it up by hand.
Read: Lawn Mowers – The Different Types
Moss Killer or Iron Sulphate
You’re going to have to kill the moss!
Applying a moss killer, or Ferrous Sulphate will kill the moss and turn it black.
I recommend you choose a water-soluble moss killer like Pro-Kleen. Granular products usually come as a feed, weed, and moss killer. They’re good for keeping moss at bay but as a dedicated moss killer, they’re pretty useless.
Your lawn will look horrible for a little while but it’ll thank you for it when the moss is gone.
No products found.
Or Read: The Best Moss Killer For Lawns: My Top 3 Picks
Watering Can and Sprinkle Bar or Knapsack Sprayer
You need a way of applying moss killer evenly over your lawn. If you don’t apply it evenly you run the risk of altering the pH balance of the soil in some areas and not others.
This will affect the way the new grass grows during recovery.
To make sure you apply your moss killer evenly use a watering can with a sprinkle bar if you have a small lawn. If you have a larger lawn, use a knapsack sprayer. It’ll be much quicker.
No products found.
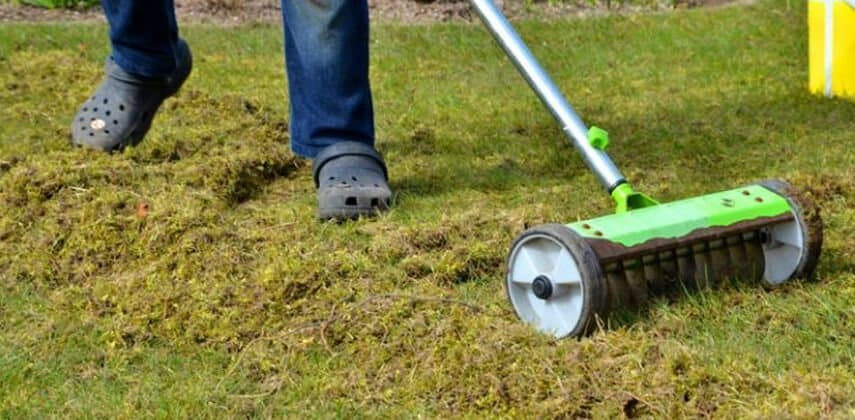
Lawn Rake
Whether it’s a Springbok rake or a powered lawn rake, you’ll need one to remove the moss from your lawn.
Raking out moss by hand using a springbok rake is exhausting work, even on small lawns.
If you don’t fancy that level of physical activity (or hand blisters), invest in a powered lawn rake. Make sure you buy one that doubles as a scarifier as this will come in super handy!
Once you’ve removed the moss you’ll need to prevent it from returning. A lawn rake that doubles as a scarifier is the perfect tool.
No products found.
Or Read: How to Choose a Lawn Rake/Scarifier
Hand Rake
Use a hand rake to gather up the moss that has been ripped from the lawn.
If you don’t want to invest in a powered lawn rake for whatever reason, get a springbok rake with thin, metal tines. These are springy and good for tearing out moss.
But like I said, it’s hard work!
No products found.
Grass Seed
 When you remove the moss from your lawn you should replace it with new grass seed.
The more grass there is in your lawn, the less room there will be for moss to make a comeback.
The type of grass seed you use will depend on a number of different factors so make sure you read this article fully before choosing.
Read: The Best Grass Seed: Reviews of Popular Products and Full Buyers Guide
Lawn Fertiliser
 In order for your new grass seed to germinate and your lawn to recover quickly, the soil must be fertile.
If it’s been covered in a thick layer of moss then chances are, it’s not got the nutrients it needs to help grass grow. In which case you need to help it along with a good quality fertiliser.
Read: The Best Lawn Fertiliser: My Top 6 Recommendations
Grass Seed and Fertiliser Spreader
Grass seed and fertiliser should be applied as evenly as possible.
It is possible to do it by hand on small lawns but it’s still easy to get wrong. For this reason, I recommend you invest in a seed and fertiliser spreader.
You can buy little and held ones for small lawns or bigger, wheeled versions for larger areas.
Hose Pipe and Sprinkler
If the weather is on your side you might not need to water the lawn.
However, if it’s dry and no rain is forecast, you’ll need to keep the soil moist to help the new grass seed germinate.
Use a sprinkler with a fine spray setting. This will keep the lawn damp without drowning the grass seed or washing it away.
No products found.
Read: What the Best Hosepipe For My Garden? 6 Models Tested and Reviewed
Lawn Moss Removal: How to Kill it and Remove it From Your Lawn
Like I have already said, moss removal is a very simple process. That said, it will take a bit of time.
Here’s how to do it;
Step 1: Cut the Grass
Lawn moss removal is that bit easier if the grass is fairly short. If the grass it long, don’t just scalp it short. That’s part of the reason you’ve got moss in the first place!
Instead, cut the grass every four days or so, reducing the height of the mower by one setting until the grass is just a couple of centimetres higher than the moss.
Step 2: Rake Out the Excess Moss
Now you need to rake out the excess moss.
It doesn’t matter if you rake by hand with a springbok rake or a powered lawn rake, chances are you’ll have to make several passes to get as much out moss as possible.
The First Pass

On your first pass, start in the corner of your lawn and rake along the long edge. Then take a step into the lawn and come back the opposite way, in exactly the same pattern as you would use cutting the grass.
Go up and down until you have raked the whole lawn.
Gather up the debris before giving the lawn a second pass.
The Second Pass

Your second pass should be at a 45-degree angle to the first, going diagonally across the lawn.
Once you’ve made your second pass, collect the debris.
The chances of you removing all of the moss in this first session are almost impossible, especially if the moss is deep.
So once you’ve removed the excess moss, apply a moss killer to the rest.
Step 3: Apply a Moss Killer and Leave it for 7-10 Days
Moss killer usually only penetrates the top couple of centimetres. If you apply it first and then rake you’ll, end up with the same result as if you’d just raked the moss without applying it.
You’ll have wasted both time and money.
It’s better to rake away the excess first and then apply your chosen moss killer to the remaining moss.
So once you’ve raked the lawn and removed the excess moss, apply the moss killer according to the directions on your chosen product.
If you use Ferrous Sulphate, make sure the lawn is damp as this will help it penetrate the moss. However, if you’re using a different type of moss killer, make sure you read the instructions as some require the lawn to be dry.
Once you’ve applied the moss killer, let it get to work for at least 7 days. Some products claim to kill moss in 24 hours but for best results, give it a few days to work.
Step 4: Rake the Lawn Again
After a few days, the remaining moss will have died and turned black. Your lawn will look pretty terrible.
But don’t worry, things get worse before they get better!
Now it’s time to rake the lawn again to remove what’s left. Go in the opposite directions to when you raked the lawn the first time around.
Step 5: If You Have a Powered Lawn Rake that Doubles as a Scarifier…
It’ll probably be a good idea to scarify your lawn while you’re at it.
If your lawn has been buried under moss you’ll probably find that there’s a buildup of thatch too.
It makes sense to scarify now, while the lawn is looking at its worst. Plus, scarifying will open up the soil making a good bed for new grass seed and fertiliser, as well as allow in oxygen, nutrients and water.
What to Do After Removing Moss From Your Lawn
Even if your lawn didn’t have much moss, raking it out will still make your lawn look a bit rough.
If you have a big infestation and you’ve also scarified, it’ll look dreadful.
Either way, you want your lawn to recover as quickly as possible. In order for this to happen, you need to do four things;
- Scarify your lawn
- Aerate it
- Overseed, and
- Fertilise it
Scarify
If you have a powered lawn rake that doubles as a scarifier, you should have already done this part.
But scarifying removes excess thatch from just beneath the surface of your lawn.
This thatch can prevent water, air and nutrients from getting to the root zone of the grass. As a result, it just sits on the surface, providing moss with the perfect conditions for growth.
Remove the thatch and give that water somewhere to drain.
Aerate
Aerating your lawn will improve soil drainage.
Over time, the soil in our lawns can become compacted. As we use our lawns, the soil particles get squeezed together, making the ground hard.
This prevents water from being able to drain away so it sits on the surface. Again, this creates the perfect conditions for moss growth.
Aerate your lawn by removing cores of turf with a hollow tine aerator.
This will create space for the soil particles in your lawn to relax into. In turn, this creates space for water to drain into so it can be consumed by the root of the grass.
And it’s not just water that’s able to penetrate the soil. Air and nutrients will also be able to penetrate into the root zone.
Overseed
Many people don’t overseed their lawns after a lawn moss removal procedure. Some very well known lawn care companies don’t either.
For regular people, I can only assume they don’t know how or even know that they should. For lawn care companies, it probably comes down to cost, protecting their profit margins and making sure they have a mossy lawn to work on in the spring.
Either way, this is a mistake.
If you don’t spread new grass seed after raking, especially if you’ve removed lots of moss and thatch, your lawn won’t recover as quickly as it should. Your lawn will look a mess for longer and the probability of more moss and lawn weeds taking over will be much higher.
By overseeding, your lawn will recover and look better sooner. And when your grass is thick and lush, there’s less room for weeds and moss to grow.
Read: Everything You Need to Know About Overseeding Your Lawn
Apply a Fertiliser
If your lawn has been covered over by a thick layer of moss then chances are, the soil doesn’t have the nutrients it needs to recover quickly.
By applying a fertiliser you’ll put these much-needed nutrients back into the soil. This will help the new grass seed to germinate and grow quickly.
Read: Lawn Fertiliser: What, Why, When and How to Feed Your Lawn
How to Prevent Moss From Invading Your Lawn Again
Once you have gone through this lawn moss removal procedure and ridden your lawn of the spongy gree stuff, the last thing you want is for it to come and take over again.
At the beginning of this article, I went through the three main causes of moss infestation.
Now let’s look at them more closely and consider what you can do differently to promote good grass growth and make it difficult for moss to get a foothold.
Lawn Care Practices
Remember, these are the things that you either do or don’t do;
Not Cutting the Grass Regularly and Cutting it to Short
The Problem: If you don’t cut the grass regularly you let it grow too long. Then when you do cut it you cut it too short.
When you do this you take away most of the leaves stored water and food supply. Without this water and food, it can’t recover. It may also damage the growth crown of the grass which results in stunted growth or even death of the plant. The grass dies, turns brown and moss takes over.
The Solution: Cut the grass regularly, at least once a week. This causes the grassroots to grow sideways and grow new leaves. This means a thicker lawn with more coverage and nowhere for moss to grow.
Not Aerating Compacted or Heavily Used Areas of the Lawn
The Problem: When kids or pets play on the lawn or when you walk across the lawn every day, the soil underneath becomes compacted. This means air, water and nutrients can’t penetrate the soil or circulate around it.
The result is a tired, unhealthy lawn that waterlogs and encourages moss to spore.
The Solution: If compaction is localised (around washing lines, kids goal posts or the route that the postman takes across the lawn) then spike it regularly with a lawn spiker or aeration sandals. This will let air, water and nutrients back into the soil.
Then every couple of years, in the autumn when the ground is softer, hollow tine the whole lawn. This will relieve compaction across the whole lawn, allowing it to breathe, improving drainage and the lawns overall health.
Read: Lawn Aeration: Everything You Need to Know About Aerating Your Lawn (The Ultimate Guide)
Poor Use (Or No Use) of Fertilisers
The Problem: Moss thrives in nutrient-deficient soil. If your lawn lacks in nutrients, or you give it the wrong nutrients at the wrong time of year, grass can’t grow properly and your lawn won’t be able to fight off a moss attack.
The Solution: Give your lawn at least one good feed a year with a good quality, slow-release fertiliser in the spring. If the soil is clay-based and your lawn is prone to moss infestations, apply a fertiliser in the autumn. You could also give it a dose of Ferrous Sulphate in the winter to keep the moss at bay.
Read: Lawn Fertiliser: What, Why, When and How to Feed Your Lawn
Not Scarifying to Remove Excess Thatch
The Problem: While some thatch is actually beneficial to your lawn, too much of it reduces the amount of water, air and nutrients that can reach the roots of the grass plant. This means the grass doesn’t get what it needs to grow and stay healthy.
The Solution: Remove excess thatch by scarifying your lawn. If your lawn has a lot of Ryegrass you might only need to do it every 2-3 years. However, if you have an ornamental lawn that’s full of fine fescues, you’ll need to do it every year.
Read: Lawn Scarification: Why, When and How to Scarify Your Lawn (The Ultimate Guide)
Also Read: Lawn Scarifiers: Which is the Best?
Not Picking Up Fallen Leaves
The Problem: Trees not only compete with your lawn for water and light, but they also drop leaves onto your lawn in the autumn.
Leaves that cover the lawn block valuable light which can weaken and even kill the grass at the same time that moss starts to spore.
The Solution: Pick up the leaves every couple of days during the autumn and when needed in the winter. If it’s dry and you have a lawnmower with a grass collection box, you can use it to hoover up the leaves. You could also use a garden vacuum or an old-fashioned rake.
Environmental Factors
The environment your lawn is in can also have an impact on moss;
Lawn Under a Lot of Shade
The Problem: Grass needs light to photosynthesize (produce food). Without light, this production of food can’t take place. You’ll often see that heavily shaded areas of lawn have very little grass coverage. This is ripe ground for moss to inhabit.
The Solution: Reduce the amount of shade if you can.
If the shade is being cast by your house or other buildings, there’s not much you can do apart from creating a lawn from grass seed that does well in shady areas.
That said, if the shade is coming from plants and trees there are things you can do.
For trees, make sure any branches are at least two meters off the ground. If the foliage is thick you might want to prune it to let some light through.
Be careful when working on trees and make sure the tree(s) you want to prune don’t have preservation orders on them. If they do, consult a local tree surgeon.
Bushes and hedges are dense by their nature and aren’t meant to be thinned. That said, try to reduce any overhang or reduce the height of them.
Also, raise the height on your lawnmower and keep your grass a bit longer. More grass traps more sun so it can produce more food. It also keeps the moss in the shade.
Heavy Clay Soil
The Problem: Like any other plant, grass needs air around its roots. In clay soils, this can be limited, especially when it is wet and compacted.
Grass doesn’t do well in soil like this. Growth is slow and the grass becomes weak and lacks colour. Moss, on the other hand, loves these conditions.
The Solution: To improve the soils ability to drain water and get air into the roots of the grass you may need to hollow tine your lawn every autumn.
If this doesn’t work because the clay content is so high, you might need to create a new lawn. By putting down a good quality topsoil and either laying new turf or sowing new grass seed.
Read: How to Lay Turf to Create a Beautiful Lawn: Step-by-Step
Poor Air Circulation
The Problem: If air can’t flow over your lawn, you will see a big build-up of dew which will take longer than it should to dry (as will rainwater). This means your grass will be almost permanently wet in the spring and autumn months, leaving it open to moss infestations and other diseases.
The Solution: If plants prevent the air from moving around, try thinning them out to allow more air to pass through them.
Solid fencing can be a problem too so try to use fence panels that allow air through them.
If airflow is being prevented by building and walls, there’s probably not much that can be done. You might have to concede to the fact that hard landscaping might be a better option in that area.
Dry Areas
The Problem: The edges of your lawn are quite commonly the first areas to dry out, causing the grass to either go dormant or die. This creates rough, brown edges to an otherwise nice green lawn. A perfect place for moss to invade.
The Solution: If the edge of your lawn meets a planted border, pack soil up to the edge of the lawn at a 20-degree – 30-degree angle. This prevents the grass’s roots at the edges drying out.
Walls, driveways, pathways or patios can heat up during the day and hold on to that heat during the night. If your lawn butts up to one of these hot surfaces it can dry the lawn edges significantly.
If possible, put a thermal barrier between the two. Railway sleepers are excellent for this as they don’t hold heat. If this isn’t possible, make sure to keep the edges well watered.
Competing Plants and Trees
The Problem: Other plants, especially trees compete with the lawn for the moisture in the ground. Trees can take up so much of this moisture which leaves virtually none for the lawn. This results in threadbare grass and good conditions for moss to take over.
The Solution: If possible, reduce the number of plants and trees in and around your lawn. Depending on where a tree is and how it impacts the lawn, you might choose to remove it completely.
Again, find out if a tree has a preservation order against it. If it does, consult a local tree surgeon.
North Facing Lawns
The Problem: North facing lawns are usually covered by more shade. As a result, they’re cooler and wetter. Conditions that moss thrives in.
The Solution: Raise the height of your lawnmower. Longer grass means it can trap more light, produce more food and grow strong. This will make less room for moss.
You may also need to rake to remove any moss and overseed your lawn in the spring as it will have been in the shade from mid-autumn to mid-spring. When overseeding, make sure you choose a grass seed that does well in shady areas.
The Climate
The climate is something we have absolutely no control over. But that doesn’t mean there aren’t things we can do to keep our lawns in good health when the weather changes.
If the Climate is Wet: Go through a lawn moss removal procedure in the spring and again in the autumn. Then overseed with a grass seed for shady lawns.
When you cut the grass, keep the lawnmower on the high side to keep any moss in the shade.
You can also apply a dose of Ferrous Sulphate or two during the winter to harden the turf against disease and keep any moss at bay.
If the Climate is Hot and Dry: Extended periods of drought can cause your lawn to go dormant or even die. This creates the perfect space for moss to inhabit when the rains to eventually return.
So, if you can, water the lawn regularly. Sometimes you might find that there is a hosepipe ban in your area, in which case you might want to save and water the lawn with any bathwater. Try to keep it free of soaps and apply it using a watering can.
When the weather does eventually cool and the rains arrive, overseed the lawn and give the grass a chance to recover before the moss sets in.
You’ll probably have to go through your lawn moss removal procedure in the following spring too.
Now it’s Over to You
As you can see, lawn moss removal is a pretty simple process.
However, modifying your garden and keeping moss at bay is quite a bit more involved. It’s not difficult but it is a constant battle so you might want to bookmark this page for future reference!
But now it’s your turn to get out there and attack that moss. Kill it, remove it and bring your lawn back to life.
I hope you found this article useful. If you did, I’d really appreciate it if you left a comment below.
And if you have any questions or have anything to say, again, leave a comment.
I’d also love to see your before and after pictures too. If you have any, please send them in and I’ll share them with the community.
